radino WiFi software
Overview about software running on Radion WiFi.
Overview
The In-Circuit radino WiFi combines an Arduino Micro with WiFi connectivity, integrating the entire TCP/IP stack in a small form-factor EMC-compliant enclosure.
- WiFi connectivity is provided by the Espressif ESP8266EX chip.
- User sketches run on the ATmega microcontroller.
- Sketches can be written, compiled and uploaded to the module using the Arduino IDE.
- Both chips are connected via a SPI-UART bridge provided by a SC16IS750 chip.
Main Functionality
WiFi
Act as access point with freely configurable properties or join existing networks by just setting ssid and password.
HTTP Server
A small HTTP server is running inside the ESP8266EX chip on freely configurable ports. The website is stored as a single HTML page inside the flash of the ESP8266EX chip which can be updated anytime. The HTML page is deliverd by the ESP on its own and some dynamic content features can be utilized.
- Embedding values which are requested from the ATmega
- Sending data to the ATmega
- Possibility to hide parts of the website until a valid password is given
- Getting raw values from the ATmega e.g. to process them in a client side application
Details on how to update the HTML page and utilize these functions using the Arduino IDE can be found in the documentation about the IC_ESP library. Details about how to compose the html webpage can be found at the ESP8266EX HTTPD documentation.
Telnet Server
The module can run a simple telnet server with freely configurable ports and an additional udp interface. Multiple simultaneous connections are possible. Data can be sent to all connected clients at once as well as to specific clients only. Please refer to the IC_ESP library docomentation about the usage within the Ardino IDE.
TCP Server
HTTP Client
A http request can be initialized by simply giving the targets ip, port and url. Different request methods can be selected e.g. to only get relevant data or the complete http response including all headers.
TCP Client
Multiple TCP sockets can be opened at once allowing the distribution of data e.g. sensor measurements to different hosts with low effort.
UDP Client
Simple interface to compose and send UDP packets.
First Steps
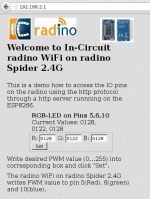
Simply connect your radino WiFi via USB to your PC to start using it. By default the radino_WiFi_Spider_demo sketch and webpage are programmed onto the radino WiFi. When powered it starts a WiFi network as access point with SSID "RADINO-WiFi" and password "12345678". The radino WiFi will have IP 192.168.2.1.
After you joined the WiFi network you can see the webpage if you point your browser to the radino IP. You can set a desired PWM value for the radino pins 5, 6 and 10. Connect some LEDs to these pins to see that it is working.
Howto
In this section we describe how to change the default radino Spider sketch to start developing your own projects.
Change network setup
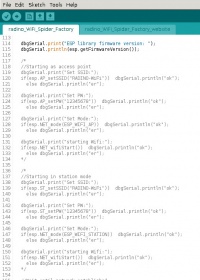
You can change the network setup. There is commented code for setting up an access point or joining an existing WiFi network (station mode).
Uncomment either of the two code sections to use the radino WiFi in a different access point setting or to let it join an existing WiFi network. In each case you can set the WiFi network SSID and password.
You can also change the HTTP port at which the HTTP server is listening. The default port is 80. Just uncomment the code section including the call to HTTPD_setServerPort to set a different HTTP server port.
Using different register values
If you want to use a different name for a register you have to change the source code at different parts.
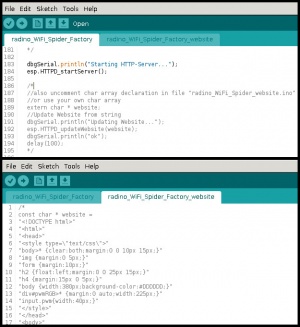
First you have to uncomment the code for updating the website in the radino_WiFi_Spider_demo file. This code is located in the setup() function. The website itself is defined in a second file called radino_WiFi_Spider_demo_website. In this file you have to uncomment the char array declaration of the website.
When the website is visited the ESP generates events for each register used inside the website. The Arduino sketch handles the events and sends responses back to the ESP. See ESP8266EX HTTPD for more details. To use a different register name we have to change the register name inside the website code and the Arduino sketch handling the events.
For example we want to change the register name in our radino_WiFi_Spider_demo sketch from 1005 to 2005. There are four occurrences in the webpage code that have to be changed. Two where the current values are printed. The other are in the submit from. On the side of the Arduino sketch you have to change the event handling in the loop() function. There can be events for get and set requests for the register. In each case the names have to be changed.
If everything has been changed you can compile and upload the modified sketch to the radino WiFi. The website will now look differently as it does not have images included. There is a file called Website_spider.htm in the same directory as the sketch. This HTML file has image included. You can upload it using the method described below in the FAQ section. Be sure to make all necessary register name modifications.
Flashing ESP
All radino modules are shipped with ESP chips flashed with our firmware. You can always change the ESP firmware. We recommend the esptool. There are several tools available for Windows users. You can find our firmware in the library directory under libraries/radino/radino_WiFi. The firmware consists of two files: 0x00000.bin and 0x40000.bin. On newer library versions only one file sdkYYY_0x00000_complete.bin is delivered.
To flash the ESP you need to program the radino module with the radino_WiFi_Firmwareupdate sketch. The ESP is flashed via the Hardware(Debug)-Serial. Flashing via the USB-Serial is not supported yet.
Once you programmed the Firmwareupdate sketch you can flash the ESP chip. Under Linux you can use the following commands (by default the Serial device ttyUSB0 is used):
 esptool.py write_flash 0x00000 0x00000.bin
 esptool.py write_flash 0x40000 0x40000.bin
 in the case of a single file firmware use:
 esptool.py write_flash 0x00000 sdkYYY_0x00000_complete.bin
 note that this will clear configuration and website on the esp
The website can be flashed this way as well. You have to add a null terminator to the end of the webpage. E.g.
echo -ne "\x00" >> website.html
The website has to be programmed to address 0x12000 for ESP firmware version 1 and 0x16000 for ESP firmware version 3 and later.
esptool.py write_flash 0x160000 website.html
FAQ
How to update/change the website?
The easiest way to update the website is to update it from within your Arduino sketch. You define the website data as a character array and upload it using the HTTPD_updateWebsite() function from the IC_ESP library. For example our radino_WiFi_TCP_push sketch (included in the library download) uses this mechanism.
Another method is to write the webpage via the UART. To make this possible the sketch has to forward the data from the UART serial to the ESP. Our radino_WiFi_Spider_demo sketch has the needed code (commented out) at the beginning of the loop() function. Once active you can just write to the serial. The first bytes have to be ICUPLOAD$ followed directly by the content of the website. Our radino_WiFi_Spider_demo contains an example webpage file.
On Window you can use the Hyperterminal or hterm to write the content.
On Linux you can use cat for example.
cat Website_spider.htm > /dev/ttyUSB0
You can also flash the website directly to the ESP chip. See above in the Howto section.
Can I upload more than one file?
The website can only be one file. Everything including styles and images have to be included in one single file.
How can I add images to the website if I can upload only one file?
You can add images by including them in-line using the Data URI scheme. The src-tag of an image element (<img>) can contain the image data directly instead of pointing to another file. The format looks like this:
<img src="data:image/png;base64,<image data>" />
Any base64 converter tool should work. An easy way to get the image data is to use Firefox. Open the image in Firefox, right click on an image and select "Inspect Element". This will open the Inspector Tool. Now right click on the img-Tag inside the source code and select "Copy Image Data-URL". The data (including data type and encoding) is now copied to the clipboard.
How large can the website be?
The website is limited to about 150kB.
What about websites on the radino32?
As the webpage is save to the ESP flash, the same restrictions apply there.
Can I use SPI?
The radino WiFi uses SPI internally for communication with the ESP chip. Nevertheless you can use the SPI with other devices. Just be sure to set chip select signals accordingly.
Can two radino WiFi modules communicate with each other?
Yes they can. Either by joining the same LAN or when one module acts as an access point.
The ESP8266EX has an externally connected SPI-flash. How large is it?
The SPI-flash has a capacity of 512 kB.
Will there modules with different SPI-flash sizes?
At the moment there are no plans to ship modules with different SPI-flash sizes.
Why is there a SPI-UART-bridge between the Atmega and ESP8266EX?
There is a SPI-UART-bridge because the Atmega32U4 can only handle UART with a baud rate up to 57600. The ESP8266EX UART works with a 115200 baud rate.
Trouble Shooting
This section describes common problems when using the radino WiFi. See also the page about common problems for all radino modules.
unknown register
If you see messages on the UART like
unknown register: 1022
it may be that you use a different sketch but the website uploaded to the ESP is from another sketch. In this case the used register number might differ and result in such messages.
To fix this you should simply upload the webpage belonging to your current sketch. See the how to above for details.
Libraries
IC_ESP: user interface to use the radino Wi-Fi
IC ESP8266EX interface: low level interface to communicate with the ESP chip


