Difference between revisions of "radino/radino32 software"
From InCircuit
(→Install Arduino IDE) |
(→Install radino library) |
||
| Line 14: | Line 14: | ||
= Install radino library = | = Install radino library = | ||
| + | * Download the lastes radino library for [[radino_Library#Downloads |Downloadpage for radino library]] | ||
| + | * Unzip the downloaded file, after it you now have two folders (hardware and libraries) and a file (README.txt): | ||
| + | <br/> | ||
| + | [[File:arduino_directories.jpg|center|Arduino Files]] | ||
| + | <br/> | ||
| + | *Now copy both folders into your main Arduino-Sketch folder.<br/>This folder was specially defined during installation or has one of the following default paths (english and german): | ||
| + | My Documents\Arduino | ||
| + | C:\Documents and Settings\yourUserName\My Documents\Arduino | ||
| + | C:\Users\yourUserName\Documents\Arduino | ||
| + | |||
| + | Eigene Dateien\Arduino | ||
| + | C:\Dokumente und Einstellungen\ihrBenutzerName\Eigene Dateien\Arduino | ||
| + | C:\Benutzer\ihrBenutzerName\Eigene Dateien\Arduino | ||
= Install driver = | = Install driver = | ||
Revision as of 14:37, 24 April 2017
Contents |
new page under construction
This page discripes how to install the Arduino IDE, add our radino library and install an example on a radino and a radino32.
Install Arduino IDE
- Download the Arduino IDE 1.6.1 from arduino.cc (direct download link: https://www.arduino.cc/en/Main/OldSoftwareReleases#previous)
- Install or unzip the Arduino IDE on your computer
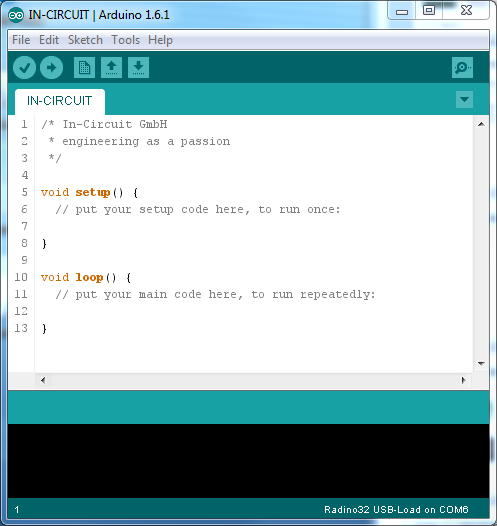
- Now start Arduino IDE. If installed properly, a windows like this should open:
Install radino library
- Download the lastes radino library for Downloadpage for radino library
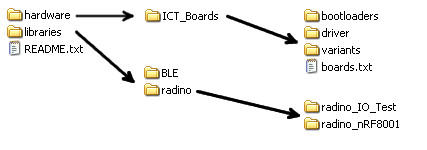
- Unzip the downloaded file, after it you now have two folders (hardware and libraries) and a file (README.txt):
- Now copy both folders into your main Arduino-Sketch folder.
This folder was specially defined during installation or has one of the following default paths (english and german):
My Documents\Arduino
C:\Documents and Settings\yourUserName\My Documents\Arduino
C:\Users\yourUserName\Documents\Arduino
Eigene Dateien\Arduino
C:\Dokumente und Einstellungen\ihrBenutzerName\Eigene Dateien\Arduino
C:\Benutzer\ihrBenutzerName\Eigene Dateien\Arduino
Install driver
on radino
on radino32
- After entering the Bootloader windows will detect the new device.
- Use the zadig driver installation tool under "%ARDUINO_APPDATA_FOLDER%/hardware/ICT_Boards/stm32l1/driver/win" to install drivers for the STM32 Bootloader.
- Make sure within the installation tool "libusbK (v3.0.7.0)" is selected.
- Windows 7 usually installs the wrong driver for radino32 automatically - this guide shows how to remove the wrong driver and install the right one.
Uninstall wrong driver
- Open the device manager
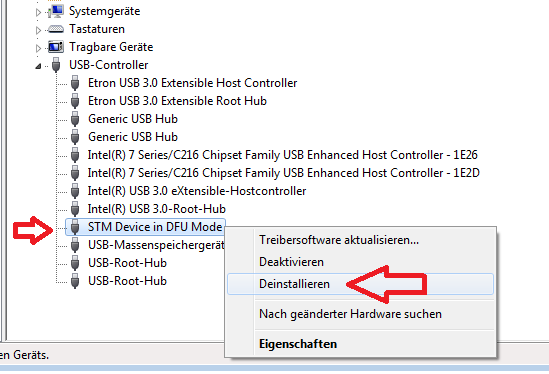
- Within section USB-Controller look for STM Device in DFU Mode
- If you formerly used another device from ST and installed a driver package, the device STM32_BOOTLOADER within another section might be the one to look for.
- Right-click on that entry and choose Uninstall
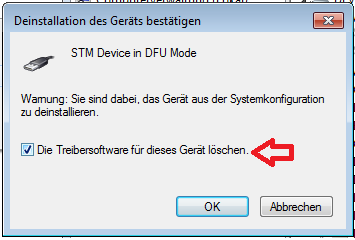
- In the upcoming window check the box and click OK
- Now disconnect the radino32 from your PC (remove the USB connection)
Reconnect radino 32 carefully
- reconnect your radino32 via USB to your PC - Windows 7 will now attempt to re-install the wrong driver
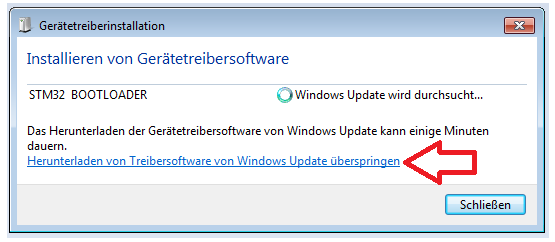
- click on the pop-up window that appears on the bottom right (don't close it)
- Click on the link to cancel driver-installation
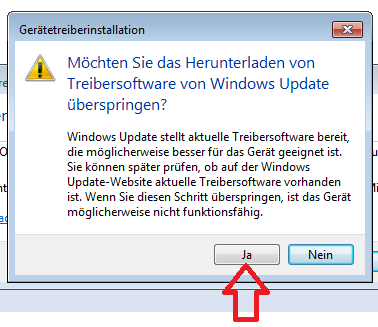
- and confirm
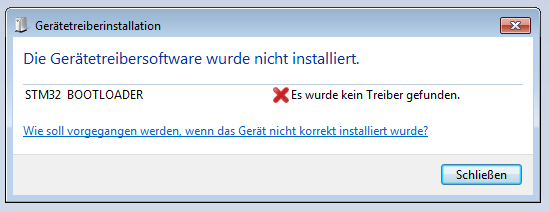
- Windows driver installation was cancelled
Install new driver
- Locate the driver installation files as described here: radino32_software#Installing_bootloader_drivers
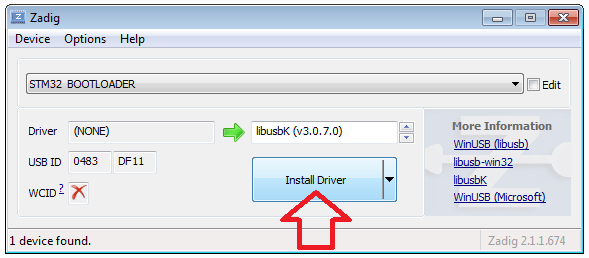
- Now run zadig driver installation to install radino32 driver
- The installer recognizes the STM32 BOOTLOADER - now select libusbK and run Install Driver
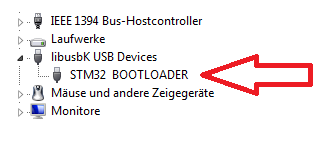
- The device-manager now shows your radino32 as STM32 BOOTLOADER within section libusbK USB Devices
- The radino32 driver is now installed successfully on Windows 7
